How to Sew Linen Napkins with Mitered Corners

I am always trying to come up with ideas for really great gifts that are functional and personalized, but they also don't take eons to finish or tons of supplies. So with the holidays nipping at our heels, I wanted to share my technique for Easy Mitered Corners.
The written instructions are a bit long, but it goes quickly as each step is pretty simple. I recommend that you do a practice corner first to get the hang of the process. Then this technique will be a snap when you start on your actual napkins.
Introduction:
I used 1 1/4 yards of 57" wide Linen (available here)
On a piece paper, draw two lines at right angles to one another.
Now mark 2 lines running parallel to those first lines but 1” away to the outside.
Mark a 45 degree line across the corner as shown in my photo. Trim off the triangle on the paper.
The written instructions are a bit long, but it goes quickly as each step is pretty simple. I recommend that you do a practice corner first to get the hang of the process. Then this technique will be a snap when you start on your actual napkins.
Introduction:
I used 1 1/4 yards of 57" wide Linen (available here)
- Prewash the fabric, and cut 6 pieces @ 19" x 19"
- Print or embroider your napkins after they are sewn'
- Only the sewing and cutting instructions are provided here.
- Remember to double click on an image to see the larger version of it.
On a piece paper, draw two lines at right angles to one another.
Now mark 2 lines running parallel to those first lines but 1” away to the outside.
Mark a 45 degree line across the corner as shown in my photo. Trim off the triangle on the paper.
Fig.2. Press each raw edge of your fabric under, towards the back side, 3/8”.
Fig.3. Unfold the edges you just pressed, and put a pin in where the creases intersect.
Fig.3. Unfold the edges you just pressed, and put a pin in where the creases intersect.
Fig. 2-3

Fig.4. Fold the two pressed edges together starting exactly at the pin in the corner, and pin folded edges together.
Fig.5. Now use your template to mark across the corners for your stitching line. The top edge of the template goes right at the top on the fold of fabric, and the intersecting point goes on the diagonal fold of the fabric.
Fig. 4-5
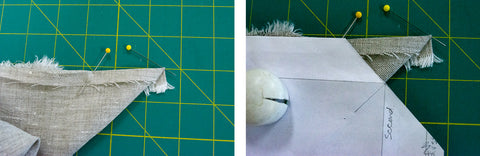
Fig.6. Set your sewing machine to a short stitch length, and stitch from your folded edges to the diagonal fold of your corner. Back stitch at the beginning, but stitch right off the edge at the lower edge. Trim the seam on the right side of your stitching.
Fig.7. Trim the seam allowance to 3/8", and press the seam open. You can trim the point a little, but don't cut it too close.
Next turn your corner inside out and pole the point out with a point presser or blunt ended object.
Fig.6-7

Fig.10. Turn your edges under 1” for the second turn and pin in place. Start at a corner, and stitch on the backside very close to the inside edge of your fold. Your stitching should be about 1" from the outside edge. Turn to the right side, press, and you are done!

Note: These leaf images were printed using hand carved blocks with my original designs.
